Today, we would like to give you an understanding of how analysts work their way through malware and give you some insights into the code of one of the most sophisticated digital threats. In this current example case, we decided to work with a memory dump (crash dump) of a system infected with Uroburos. To facilitate the analysis, we added an extension to add the support of python, called: PyKd. WinDbg has its own script language, but it is not easy to understand. One can download this python extension here, for free: http://pykd.codeplex.com/.
To realize this article, the machine was infected by the Uroburos dropper with the following md5: 626576e5f0f85d77c460a322a92bb267.
Visualization of the hooks
The Uroburos rootkit adds several hooks to hide its activity. In our specific case, the hooking is a technique used to alter the behavior of specific system functions; the rootkit fakes the output of the Microsoft Windows API. For example, it hides registry entries, files and more.
To perform this task, the rootkit developers decided to use interrupts. We can display the Interrupt Descriptor Table (IDT), as shown below. The IDT table stores pointers to ISR (Interrupt Service Routines), which are called when an interrupt is triggered.
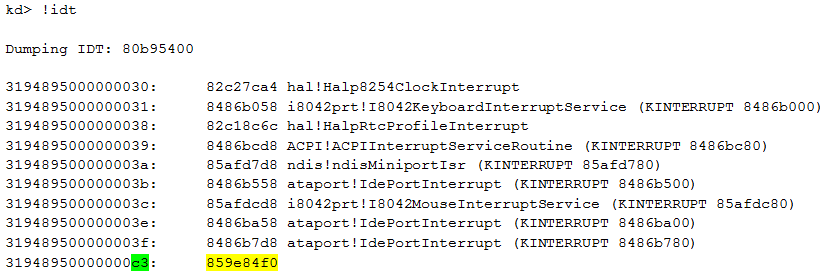
One of the pointers (0x859e84f0) is unknown and cannot be resolved. All other pointers have a function name, following the address. The last digits of the first column are the ID of the interrupt (in our case 0xC3). We can disassemble the code available at this address:
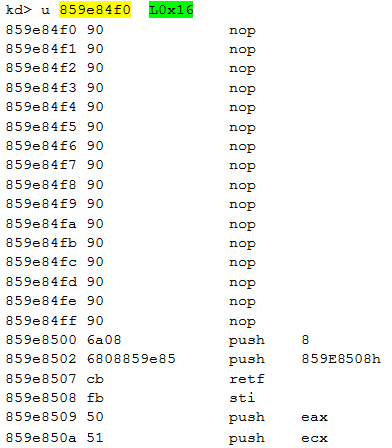
The last argument of the WinDbg command is the length (L0x16) to disassemble. The function starts by a series of NOP. The interrupt 0xC3 is used by the malware, the next step is to identify how and when this interrupt is triggered. Here is the code of the beginning of the function IoCreateDevice():
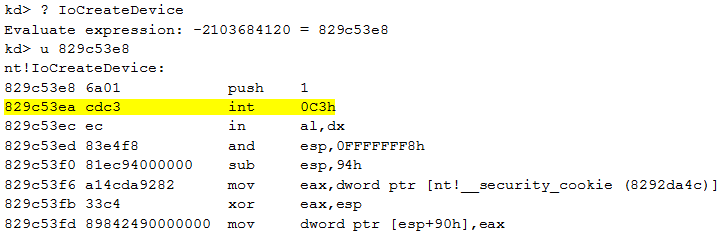
We can see that the second instruction is int 0xC3 (interrupt 0xC3). Thanks to the PyKd extension, we can easily create a python script to detect every function with this interrupt:
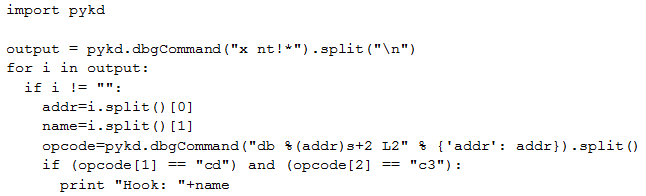
This script starts to list each exported function in ntoskrnl.exe. Secondly, for each function it checks if the second instruction is int 0xC3 (cdc3). If it is the case, the exported function’s name is displayed. Here is the output of the script regarding the current analysis:
We could use the function: !chkimg to easily identify the hook. However, it was a good exercise to play with PyKd.
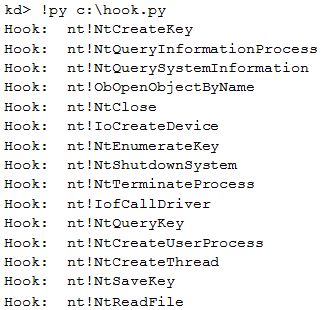
Another interesting step is to dump the code of the driver. To perform this task, we first need to find the beginning of the PE. We can find the address thanks to the address of the code executed when an interrupt is triggered:
This output shows us two remarkable things:
- First, the driver uses a well-known Windows kernel memory pool tag called "NtFs". The Windows components mark allocated memory block with a unique tag. But the rootkit uses the same tag as the legitimate ntfs.sys driver. This choice was made to hide the rootkit and dupe the analyst.
- Secondly, the output looks like the beginning of a PE. But this PE is broken: the MZ is not available and some information is missing. For example, the value of the SizeOfImage (85980000+0x140) is null...
The rootkit alters the beginning of the PE to hide itself. Some tools parse the memory and look for the MZ string to identify the beginning of a PE. In our current case, if we used these tools looking for a PE file, we would never identify our malware using this automation. Manual analysis is needed here. To dump our driver we need to reconstruct the PE but we don't know the size of the binary, as mentioned above, so we need to make a large dump, to be sure to not forget a part of the binary.
Modules, drivers and devices
We can now display the loaded (and unloaded) modules with WinDbg:

In our case, the rootkit’s module is fdisk.sys. According to the code shown above, it seems to be unloaded, but as we analyzed before, the code is really present on the infected system. So, the developers found a way to unload the modules while the malicious code is still running!
We can list the drive
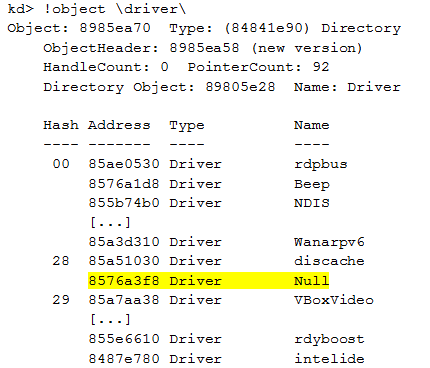
The driver used by our module is \driver\Null. All other modules are legitimate modules used by Windows. We can display the devices associated to the driver we are focusing on:
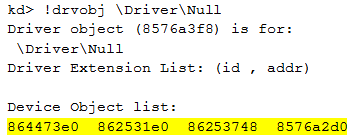
The device objects associated to our driver are:
- 0x864473e0
- 0x862531e0
- 0x86253748
- 0x8576a2d0
Furthermore, we can see the description of those devic
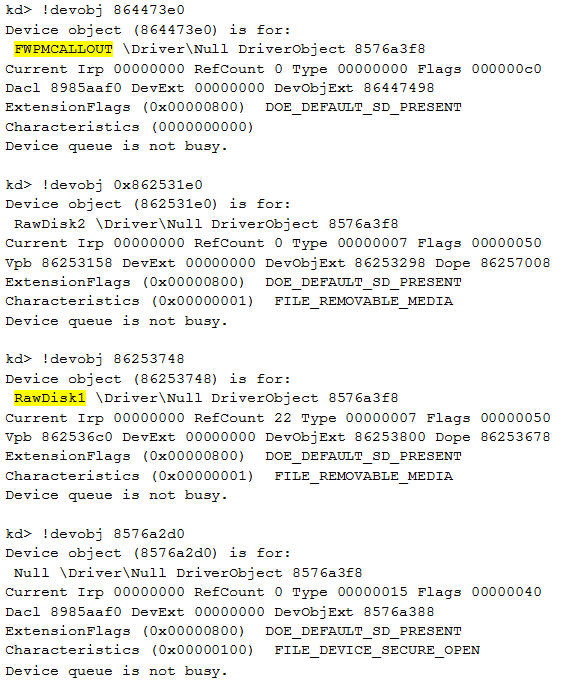
Two objects are particularly interesting: FWPMCALLOUT and RawDisk1
WFP callout
This first device is FWPMCALLOUT. Thanks to the name of the device we can guess that the rootkit registers a callout for Windows Filtering Platform (WFP). The WFP is a set of API and system services which provides a platform for creating network filtering applications. In our case, the rootkit uses this technology to perform Deep Packet Inspection (DPI) and modifications of the network flow. The purpose of this device is to intercept relevant data as soon as a connection to the Command & Control server or other local infected machines used as relay is established and to receive commands.
As there is no command to simply list the WFP callouts, we have to extract the information needed using different steps:
First, the netio!gWfpGlobal variable contains the starting point for the WFP data structures:

A global table stores the number of callouts and the array of the corresponding callout structures.
Here is a method to find suitable offsets:
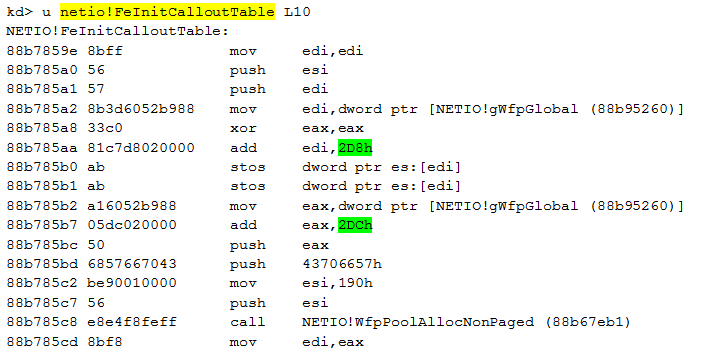
The first number is the offset that contains the number of total callouts made, in hex, of course:

The second number is the offset that contains the array in which the callout structure is stored:

The pool tag of this address confirms our findings so far and proves that we have found the right track:

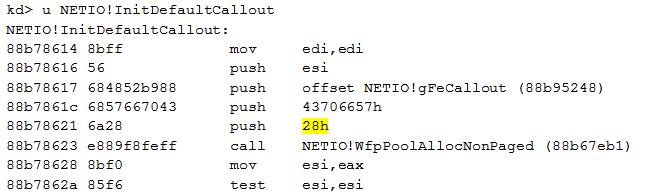
We can now extract the size of each structure stored within the array. As it is not documented by Microsoft, we identify the size by disassembling the function InitDefaultCallout():
Finally, we use a one-liner command to list the elements of this array:
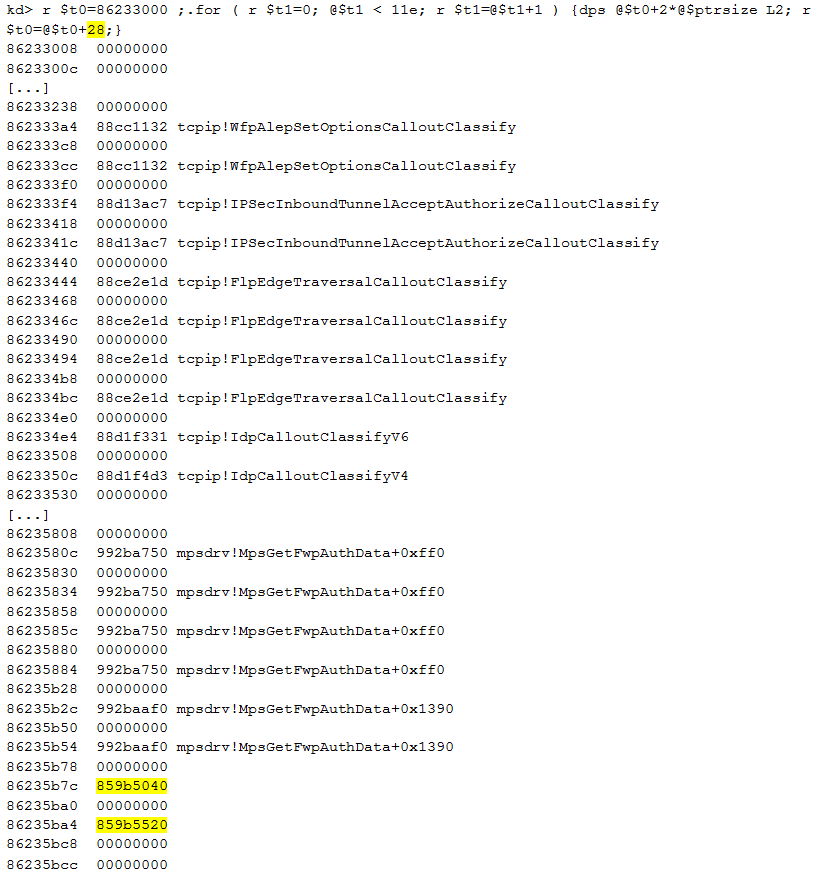
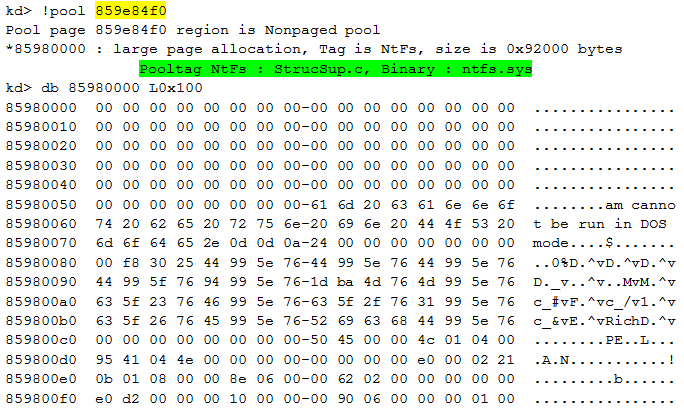
The list of elements reminds us of the information we have seen in the IDT: two addresses are not resolved. Those two WFP callouts are: 0x859b5040 and 0x859b5520. WinDbg is not able to resolve these two addresses because the addresses are unknown. These are not addresses of a Microsoft. Now that we have the addresses, we can use the command !pool to validate that the addresses are in the same region as the code executed when an interrupt is triggered:

Virtual file system
Previously, when looking at the device objects, we came across two devices with very similar names: RawDisk1 and RawDisk2. Let us have a detailed look at the first one:
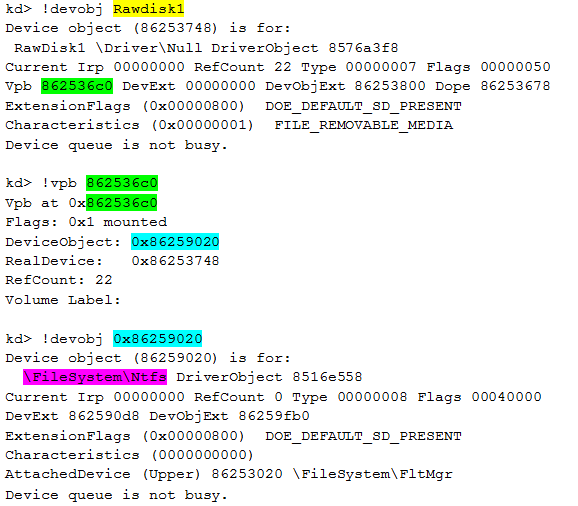
As we can see, RawDisk1 device is in fact an NTFS file system; a virtual file system used by the rootkit to store its configuration, the exfiltrated data…
We can identify the used files (opened handles) within the file system, like \queue and \klog:
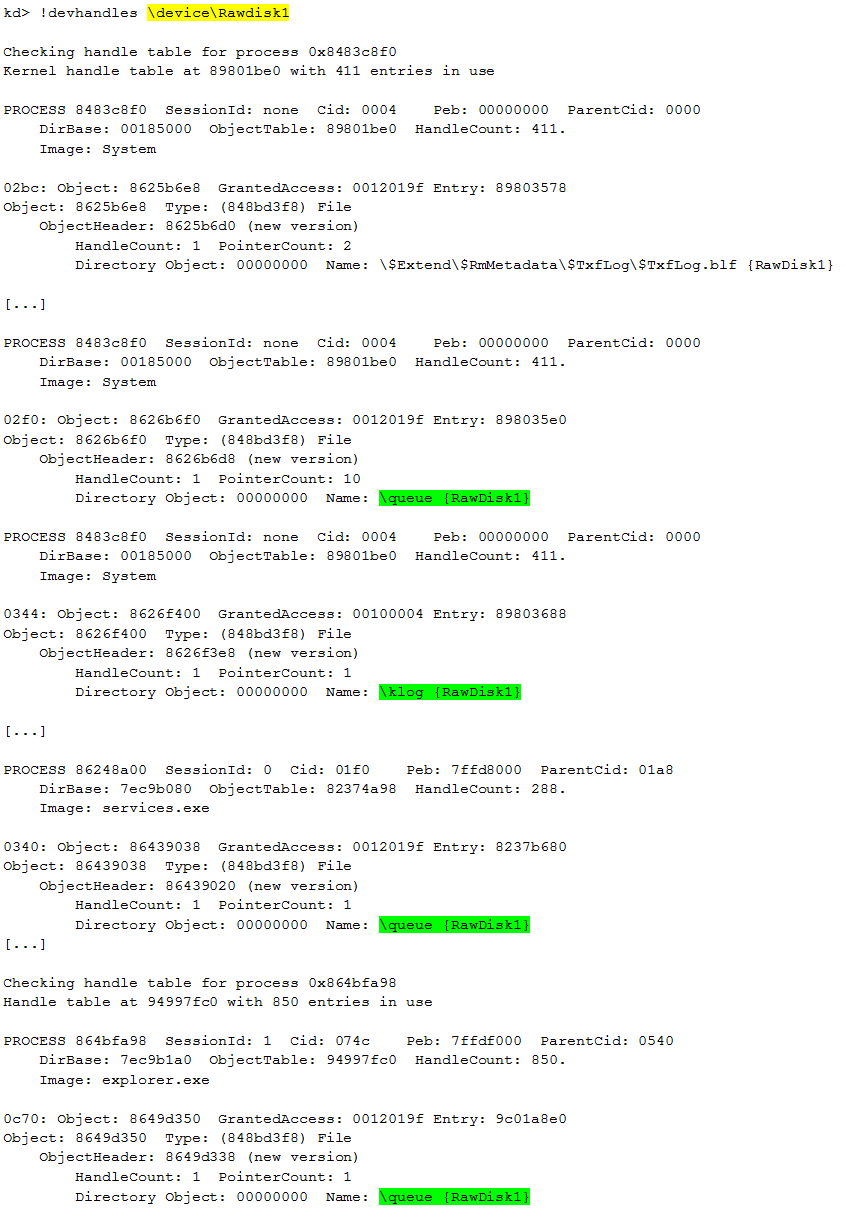
Thanks to this command we are able to list the files hidden from the operating system.
Digital signature enforcement
Microsoft created a Driver Signing Policy for its 64-bit versions of Windows Vista and later versions. To load a driver, the .sys file must be signed by a legitimate publisher. Developers may disable the Driver Signature Enforcement process during the development phase of a driver, which means a developer does not have to sign each compiled driver version during development phase. This mode is called “Test-mode”. In our case, the rootkit is not signed, which would usually mean that it had no chance to be accepted by Microsoft’s policy, but it disables the digital signature process to circumvent the checks. The status of this feature is stored in the global variable nt!g_cienabled. Compare the value of this variable on a clean system, without infection with the same information on an infected system:

The code above shows that the value is set to 1

We can clearly identify that the malware disabled the driver signature enforcement. Generally speaking, we could do the same by using bcdedit.exe -set TESTSIGNING OFF, to switch into testing mode to be able to load unsigned driver. The difference is: Using bcdedit.exe triggers a message window which is shown to the user, at the bottom of the desktop, and this is not very secretive. The action could be detected immediately.
More information about the malware’s circumvention of the driver signature enforcement can be found in our SecurityBlog article: Uroburos – Deeper travel into kernel protection mitigation
Conclusion
What you have seen now, is a very limited part of the extensive analysis of complicated malware and a very short introduction into WinDbg. Generally, it is very hard to apprehend such an extensive tool, but when working on such a case of kernel land analysis, researchers do not have a choice.
Processed like this, in an article with code snippets, the results seem logic and do make perfect sense. But, believe us, working with malware code costs a lot of extensive training, experience and time.
Related articles
2014/05/13 Uroburos rootkit: Belgian Foreign Ministry stricken
2014/03/07 Uroburos – Deeper travel into kernel protection mitigation
2014/02/28 Uroburos - highly complex espionage software with Russian roots
2014/02/28 G DATA RedPaper about Uroburos